
Unlock the Power of Photeeq Lens Flare Tips and Techniques
Learn how to use Photeeq lens flare to create beautiful, professional light effects. Simple tips, creative ideas, and beginner-friendly guidance included.
Introduction
Photeeq lens flare is a powerful tool for photographers and designers. It helps create beautiful light effects, such as sunbursts, streaks, and light circles. These effects can turn ordinary photos into eye-catching images. Many users love photeeq lens flare for its ease of use and realistic results. Whether you’re new to photography or a seasoned professional, learning how to use lens flare can add magic to your pictures. In this guide, we will explore how photeeq lens flare works, how to use it, and how it can enhance your photos. We’ll also give tips, tricks, and creative ideas for the best results.
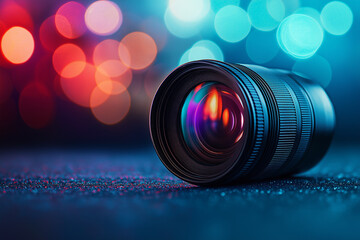
What is Lens Flare?
Lens flare happens when bright light hits your camera lens and bounces around inside it. This light creates streaks, circles, or even star-shaped effects. Sometimes, it appears when shooting directly into the sun or a very bright light. While it can be a mistake, it can also be a beautiful effect. Some photographers use lens flare on purpose to add emotion, drama, or a cinematic feel. With digital tools like photeeq lens flare, you don’t need special lighting or camera angles. You can add these effects later to make your photos look amazing.
Why Choose Photeeq Lens Flare?
There are many lens flare tools out there, but photeeq lens flare stands out. It offers a wide range of realistic effects that mimic how light behaves in real life. The tool is simple, fast, and offers high-quality results. It is perfect for photographers, digital artists, and graphic designers. Another great feature is how easy it is to adjust. You can control the size, brightness, and angle of the flare. That makes it perfect for both beginners and professionals. The flexibility and realism it offers make photeeq lens flare a top choice.
How to Use Photeeq Lens Flare
Using photeeq lens flare is easy. First, open your image in the software that supports the photeeq plugin. Next, choose the lens flare effect you like from the library. Then, adjust the flare’s position, size, and brightness until it looks right. Make sure it blends well with the photo. Don’t overdo it, as too much flare can ruin the image. Always check how it looks in both dark and light areas. Try moving the flare slightly to get the best light balance. Practice makes perfect. The more you use it, the better your photos will look.
Types of Lens Flare Effects
Photeeq lens flare includes many types of flares. You’ll find light rings, starbursts, streaks, and glowing dots. Some flares are soft and dreamy, while others are sharp and bold. Each type adds a different mood to your photo. Use a soft glow for a romantic sunset. Try sharp streaks for a cool action shot. Knowing the different types helps you pick the right one for your photo. Try combining types to create custom effects. Photeeq lens flare gives you the tools to get creative.
When to Use Lens Flare
Lens flare works best in specific situations. Use it in sunset scenes, backlit portraits, or outdoor shots. It adds warmth and emotion to the photo. You can also use it in urban scenes for a modern, glowing effect. But be careful with indoor photos. Too much lens flare can look unnatural. Always think about the story you want to tell with your photo. If the light effect supports that story, go for it. Photeeq lens flare helps you do that easily and quickly.
Avoiding Common Mistakes
Using photeeq lens flare is fun, but there are mistakes to avoid. Don’t use the flare in every photo. It can become boring or distracting. Avoid placing the flare where it covers faces or important parts of the photo. Also, don’t make the flare too bright. It should blend with the scene, not overpower it. Always preview your work before saving. Ask friends or peers for feedback if you’re unsure. With time, you’ll learn how to use it perfectly.
Matching Lens Flare with Your Photo Style
Different photos need different styles of lens flare. For example, a dreamy landscape may need a soft, faded flare. A high-energy sports photo may need bold, sharp streaks. With photeeq lens flare, you can match the light effect to your photo’s mood. This adds depth and emotion. Think about colors too. Warm tones work well with sunset flares. Cool tones go well with starbursts. Matching the flare to your style makes your images stronger and more professional.
The Cinematic Look
One of the most popular uses of lens flare is creating a cinematic look. Movie directors use flares to make scenes feel more dramatic or real. With photeeq lens flare, you can do the same with your photos. Add light streaks to make it feel like a film still. Combine this with contrast and color grading for full effect. Try experimenting with different flare placements and angles. Soon, your photos will have a Hollywood-style glow.
Editing Tips for Better Results
Here are some editing tips to make your photeeq lens flare effects even better. First, use adjustment layers so you can easily change or remove the flare later. Second, blend the flare with soft edges. Hard edges can look fake. Third, match the light direction in your photo. The flare should come from the same angle as the main light. This keeps it looking natural. Use shadows and highlights to help the flare blend better.
Combining Effects
You don’t have to stop at one effect. Photeeq lens flare lets you combine multiple flares. You can layer them for a more complex look. Add a small ring flare in one corner and a streak across the sky. Use blending modes like “Screen” or “Overlay” for better results. Combining effects creates a unique, custom look. Just remember to keep it balanced. Too many effects can make the photo messy.
Photeeq for Social Media Content
Lens flare effects are great for social media. They catch people’s attention as they scroll. Use photeeq lens flare to make your photos pop on Instagram, Facebook, or Pinterest. Bright, warm flares often perform well. Try using them in travel photos, selfies, or lifestyle shots. These effects make your content stand out. They also help tell your story with more emotion and style. Keep it consistent with your brand look for best results.
Using Flare in Portraits
Adding lens flare to portraits can give a natural and soft glow. It can make skin look warm and highlight hair in a beautiful way. But use it carefully. Make sure it doesn’t hide facial details. Place the flare behind or beside the subject. This adds depth without distraction. With photeeq lens flare, you have full control to place it just right.
Enhancing Landscapes
Photeeq lens flare works wonders for landscape photos. It adds a sun-drenched feel or a sense of magic. Try adding a flare near the sun or horizon. This brings out the sky and adds visual interest. Use soft flares for a peaceful morning. Use bright, sharp ones for bold sunset scenes. Your landscape photos will look more alive and professional.
Perfect for Product Photography
Want to make your product photos look more appealing? Add a touch of lens flare. It adds light and depth to make the product stand out. Use photeeq lens flare to highlight shiny surfaces or add glow. This can work well for beauty items, tech gadgets, or drinks. But keep it subtle. Too much light can take focus away from the product.
Using Photeeq in Graphic Design
Graphic designers also love photeeq lens flare. It works great in posters, covers, and advertisements. Add a flare to highlight text or draw the eye. Combine it with gradients, shapes, and shadows for creative results. You can use it to guide viewers through the design. It adds motion, energy, and sparkle. Try using it in background layers for a soft glow.
Photeeq in Videos
Photeeq lens flare isn’t just for photos. You can also use it in videos. Add it to video clips to give them a movie-style glow. It works great for travel vlogs, music videos, and cinematic scenes. Make sure to match the light movement in the video. This keeps the effect natural and professional.
Keeping it Real
Always aim for realism when using lens flare. Think about where the light comes from in your photo. The flare should match this direction. Shadows and brightness should support the flare. Use color correction to make the flare feel part of the scene. Photeeq lens flare makes this easy with its flexible tools. A realistic flare adds emotion and makes photos more believable.
Getting Inspired
Still not sure how to start? Look at other photos for inspiration. Study how professional photographers use lens flare. Try copying some of their ideas using photeeq lens flare. Then, make it your own. Try new angles, colors, and shapes. Keep learning and experimenting. With time, your skills and creativity will grow.

Conclusion
Photeeq lens flare is a powerful and easy tool for anyone who wants to add stunning light effects to photos. It offers many options, from soft glows to dramatic streaks. Whether you’re a beginner or a pro, this tool helps make your work stand out. Remember to use it with purpose and care. Match the effect to your photo’s style and message. Practice and creativity will take you far. Start today and make your images shine with photeeq lens flare.
Read Also: What is Develop Oxzep7 Software? Step By Step Guide